Simple Steps on How to Paint a Vintage Clock
I take you through simple steps on how to paint a vintage clock.
I found this clock at Goodwill.
It wasn’t quite my style but I loved the side spindles and straight lines.
My first reaction was to pass it up.
But as I stood in line, my mind started thinking about all the ways I could change the clock to look like something amazing in my home.
Before you knew it I got out of the line and put this clock in my cart.
This tutorial takes you step by step on how I transformed this vintage clock into something that now goes beautifully with my Victorian Farmhouse-styled home.
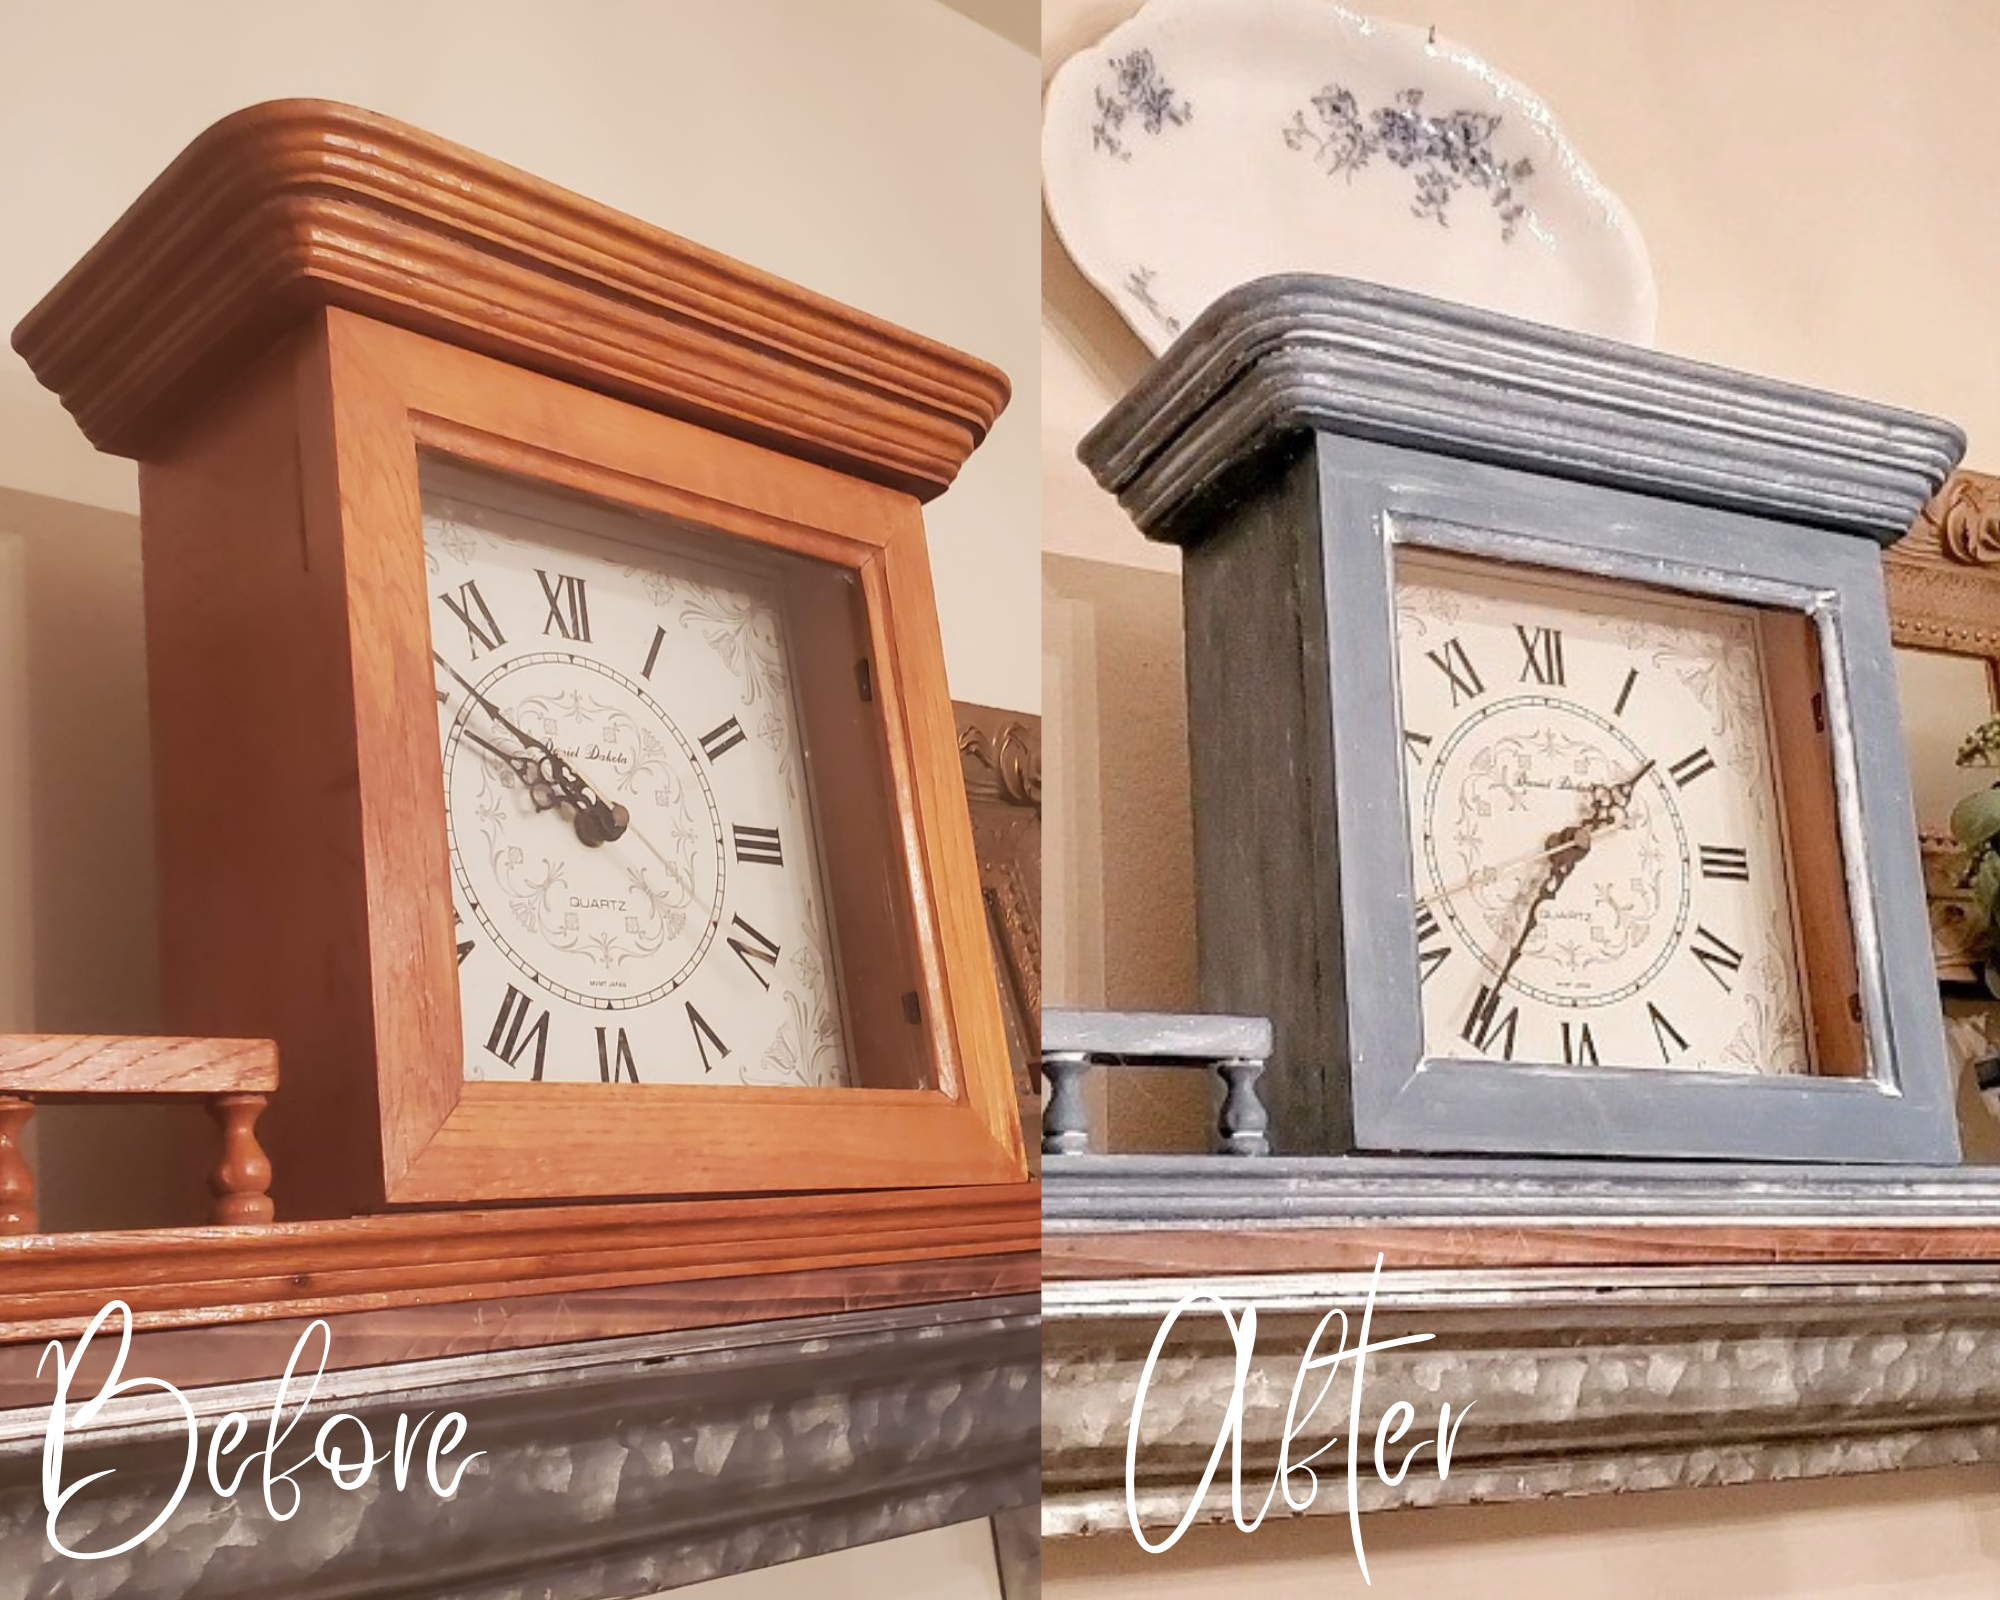
Here is the antique clock before the makeover.

What you will need for this DIY project:
- Folk Art Chalk Paint in the color, “Turkish Tile.”


- Two small paint brushes. Linking the exact brush set I used for this project.


- Garbage bag to protect work surface
- Paint stir stick
Now onto the simple steps on how to paint a vintage clock.
Step 1: Clean the glass and the wood of the clock.

Taking an all-purpose cleaner and a cloth I wiped off all the dirt.
This clock came from Goodwill and needed a good cleaning.
Step 2: Open it up to clean the inside of the glass.

This was a nice feature to be able to open up the face of the clock.
It made it easy to get the glass perfectly clean.
Now onto step 3: Cover the glass with frog tape.

Make sure to use the edges of the tape to butt up against the sides of the glass.
In the corners, I folded the tape to have a clean edge.
Then placed another piece to hold that down.
When necessary layer the tape to fully cover all of the glass.
Tip: If you do get paint onto the glass after painting, you can take a razor and gently scrape the paint off.
Step 4: Stir the paint.

Using a stir stick, stir the Folk Art paint thoroughly until it is smooth.
Step 5: Paint the front of the clock.

To make the paint go on smoothly I paint with the grain of the wood.
I use a small amount of paint and then brush back and forth to give it an even finish.
And now for step 6: Paint under the spindles.

This clock has unique spindles.
I applied paint using a side-to-side stroke for each spindle.
To paint the gaps between the spindles I painted sideways to get good coverage.
Then I went over it making sure to keep painting with the grain of the wood.
This will give it a nice smooth surface once it dries.
Step 7: Paint the top of the clock.

I like to paint from side to side. It makes it look uniform.
After painting one side, I paint the top of the clock.
Using a side-to-side motion to stay with the grain of the wood.
Note: Using a small brush for this project helped to get into all the intricate areas easily. It didn’t take that much more time to use a small brush. It was perfect for painting this clock.
Step 8: Paint the sides and the spindles.

Repeat step 6 and paint the spindles and between the gaps for the other side of the clock.
Not forgetting to paint the sides as well.
Then onto step 9: Turn the clock on its side.

By turning the clock sideways, you can see unpainted areas.
Using your brush paint the backside of the clock.
And the other side of the spindles and the backside of the rack.
This goes for turning it sideways and viewing the front, too.
Paint any visible spots that were missed.
This will ensure that all the surfaces are painted thoroughly.
Steps 10 & 11: Let it dry for 30 minutes then paint the clock upside down.

After letting the paint dry turn the clock upside down.
Paint the underside of the rack and the spindles.
Step 12: Paint the bottom of the clock & any unpainted areas

It is tempting to skip this step since it’s not going to be seen when sitting upright.
But it is important to paint the whole clock.
The final project will look complete and if the bottom of the clock pulls forward when on a shelf, it will be painted and look good.
At this angle, unpainted areas will be missed because of the indented grooves or edges.
Go over them with a light stroke of paint.
Make sure to look all over the clock for any missed spots.
While the clock is upside down, leave it and let it fully dry. This may take 30 minutes to an hour.
Now for step 13: Apply Annie Sloan white wax.

Using a microfiber cloth, dip a corner into the wax.
Using a side-to-side motion, cover the entire surface.
Step 14: For a chunky look apply wax to the grooves and edges.

As I’m applying the wax to the front of the clock, I’m using my fingers to smooth out the build-up.
Once I’m done, I take a clean part of my cloth and rub the wax until it is evenly distributed.
Step 15: Apply the wax to the top of the clock.

Using a side-to-side motion, I rub on a good amount of wax to the top.
Make sure to rub it in.
It will have white strokes.
This is what you’re wanting.
Now onto step 16: Apply wax to the sides of the clock.

For the flat surfaces repeat the side-to-side motion when applying the wax.
Applying an even amount onto the entire clock will seal it to last for years to come.
Any build-up that occurs on the edges, make sure to rub those in.
Step 17: Apply wax to the spindles and rack.

For a chunky look, I take my fingers and apply a large amount onto each spindle.
I want this to have build-up in the gaps.
See step 19 for the next step.
Step 18: Repeat this and apply wax to the other side.

Step 19: Rub the chunky wax from the spindles.

Taking a microfiber cloth go over each spindle and lightly rub off any excess wax.
Make sure to keep the chunky parts of the wax in place.
Step 20: Turn the clock upside down and wax the bottom side.

The final step is to wax the bottom of the clock by continuing the side-to-side motion.
Rub it in until it is completely covered.
Take your cloth and rub the corners and edges of any glumps of wax.
Now let it dry overnight.
The after of my vintage clock makeover.

What do you think?
I love how it all turned out.
It has a chunky white wax look.
The blue goes perfectly with the other colors in my dining room.
I added some Goodwill pieces as well.

To this shelf, I added some Goodwill finds.
The tin and wood shelf came from Hobby Lobby. They still have this exact one.
I waited for the 50% off sale.
The square framed mirrors were found at Goodwill for $3.99 each.
I stacked some blue transferware tea cups with a single flower hanging over the edge.
On the other side, I put a small creamer that has light hairline cracks that give it an old worn look.
I found this for $1.99 on one of my thrift store shopping trips.
In it, I put some eucalyptus branches and a single creamy beige rose.
On top of the clock, I hung an oval blue floral platter.
It has a similar blue as the clock and adds to the look I’m wanting for this summer season.
Overall, it is the look I was imagining.
The day I thought up what I’d do to this clock while in the line at Goodwill. This is what I saw.
I think I nailed my vision and am happy with how it turned out.
I hope this inspires you to think outside the box and look at things at Goodwill or any thrift store a little differently.
Here is the YouTube video sharing all the simple steps on how to paint a vintage clock.
Other posts you may be interested to read for the summer season are,
- 7 Simple Steps to Makeover your Front Porch for Summer
- Thrift Store Finds Styled in My Home for Summer
Thanks for coming by Victorian Lane Farms.
Happy DIYing!
See you soon for more inspiration for vintage home decorating.