How to Make a Gallery Wall
Today, I take you step by step how to make a gallery wall.
I use affiliate links in this post.
This wall is two stories high.
The little displays of art that I had placed at eye level over the years seemed out of place.
The wall, being so tall, always felt empty.
I wanted something that was enormous. Plus, I wanted to create a Victorian vintage look.
The biggest challenge was the cost. I didn’t want it to be expensive.
To be honest, it ended up that way, anyways. Even with the Goodwill frames I ended up purchasing.
The whole project cost $200.00. But as you can see, it was worth it.

My inspiration for this gallery wall.
My inspiration came from the series, Downton Abbey.
Downton Abbey walls had huge portraits, floral and landscaped art.
It inspired me to replicate it in my home. Not to say I could ever make my home look like a castle. That’s what dreams are made of.
I put a twist to it and gave it my own flair.
What I used on my gallery wall.
I will link similar ones. Most of what I hung on this wall were things I already had or the stores don’t carry it anymore.
- Goodwill frames.
- Plain black frames from Michaels. Similar ones here.
- Rustic metal mailbox from Michaels. Similar black mailbox here. Or if you’re wanting something with more of a vintage look, this one is amazing, here.
- Black iron bird dinner bell from Victorian Trading Company. Similar one here.
- Huge wood GATHER sign from a boutique store. The one I have is about 4 feet long. Etsy has these. Here’s a smaller one that is similar, here.
- Etsy prints. Here’s a link.
- ” It is Well” white framed wall art from Hobby Lobby. Similar one, here. The one I’m linking is super cheap. If you get it, let me know what it’s like!
Note: The Etsy prints can be downloaded on your phone or computer. You can order copies from your local FedEx print shop or Kinkos. The smaller prints cost .49 to .99. That’s a deal! The larger prints (16×20 or larger) were ordered at VistaPrint. They cost between $8 to $13 each.
What you need to hang wall art:
- Thick nails with a wide head to hold up the heavy pieces. Link.
- Hammer – Link.
- Pencil to mark where to put the nail. It’s erasable.
- Measuring tape. Link.
- Ladder – you will need a tall one if your wall is two stories high like mine.
My Big Tip
Go to Goodwill or Value Village first to get your frames.
My biggest mistake for this DIY project was buying new ones from Michaels. They were simple black frames that were not cheap. Half of my expense was invested in these frames. Yes, $100.00.
It hurt!
I took a chance and went to Goodwill, not knowing what I’d find.
Boy, was I amazed. I found frames for this DIY project. Plus huge ones for my stairway gallery wall project. All for under $50. I bought a total of 11 that day. It was a bargain.
The ones I found had a chunky vintage look that was beyond my expectation. Some of them I painted. You can see the tutorial how to paint Goodwill frames here.
Here’s how I made this gallery wall.
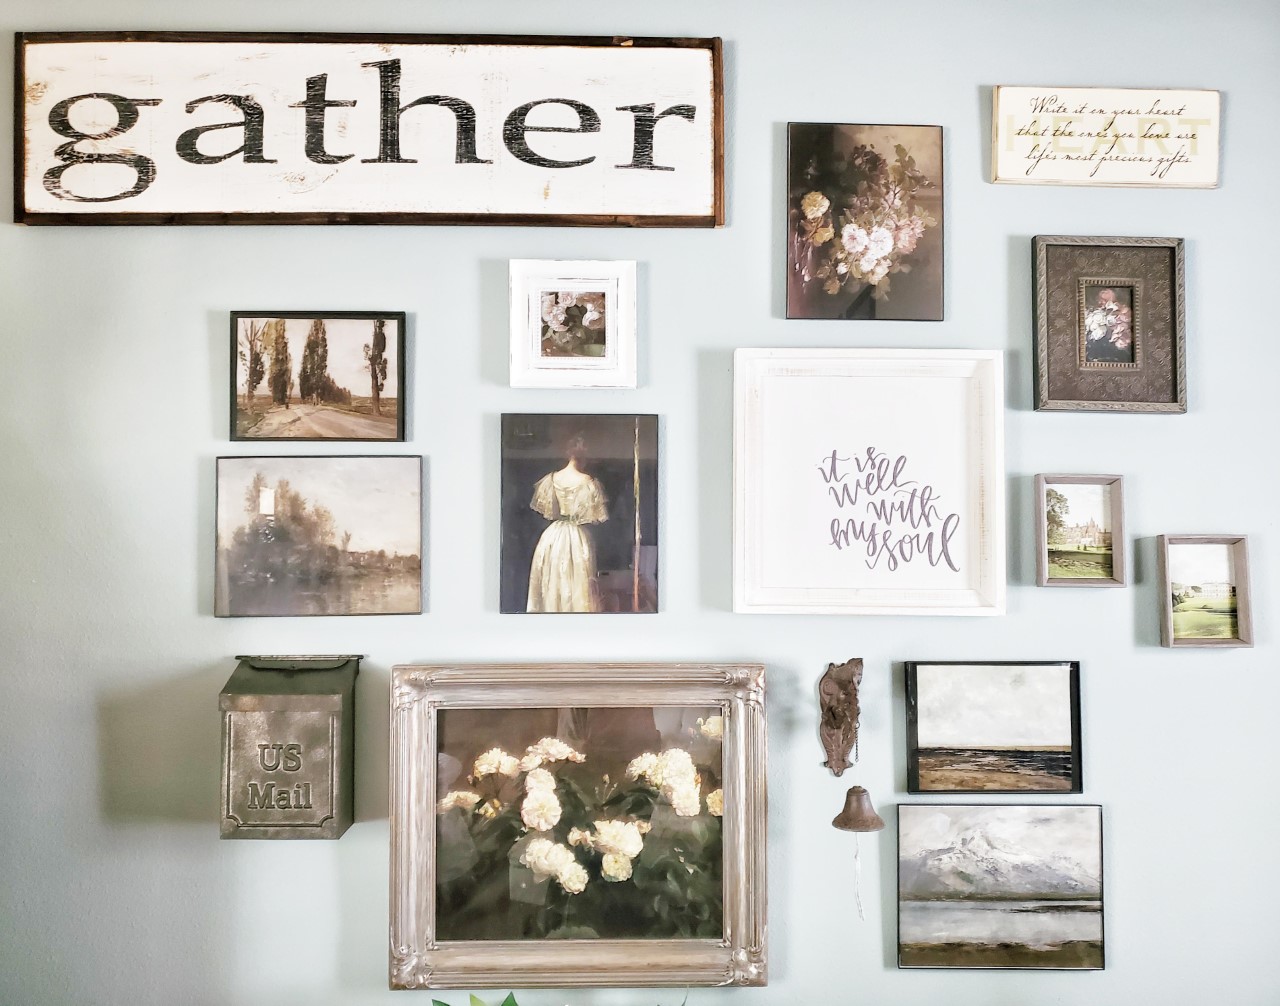
Step One: The first part of making a gallery wall is choosing a focal point. For example, I chose these two photos as my focal points.

The “Victorian lady with White Chiffon dress” print is found here.
The “French White Rose Print” here.
Step Two: Bring balance to both sides by anchoring similar sized framed art. See the photos below.
Here I zigzagged these frames, for example.
The pattern of smaller frame above and a larger frame below, gives symmetry to both sides.
I made sure to space the frames the same.


Step Three: Bring interest by adding 3D pieces.
Like this mailbox on the left and the iron bird dinner bell on the right in the photos below.
I put them on both sides to continue to bring balance to the gallery wall.


Step Four: Make sure to line everything evenly.
First, I started with the middle silver framed floral wall art.
I took my measuring tape and measured the distance between the frame and the 3D iron bird dinner bell on the right. And the mailbox on the left.
Using a pencil I marked where the nail would go after I knew where I wanted it.
To clarify, there were times I just eyeballed it. That’s ok, too.

As you see, in the photo above, I lined the bottom row to be even on top. The second row I made sure to make them even on the bottom.
The middle section of the gallery wall, I created four rows. I lined them up vertical to make them balance evenly with the ones in that vertical row.

For example, look at the photo above. You can see up close how the frames are spaced. Some are spaced the same but not all. Remember, it’s about making this eclectic. It’s unique. I love it!
Note: I did an upside down triangle on this wall. I have an armoire on the left and a desk on the right. It naturally progressed into this shape as I tried to keep equal space between them.
You can make it perfectly squared, if you are looking for a clean line look. It would look amazing having all the frames the same, all the prints similar. I love that look, too.
Step Five: Fill the space with large and small framed art or signs.
This wall required a huge sign. Like this wooden GATHER sign, for instance. It brings the eye up and fills in the space.
Climbing a tall ladder to hang this sign was a challenge. Be careful not to fall. Have someone at the bottom to keep the ladder secure, if you can.
I balanced the large GATHER sign on the left with a smaller rectangle sign on the right. It’s smaller in size and yet it’s the rectangle shape that gives them balance.
The really small frames, for example, on the right are placed at a slant. This gives interest that is different than the rest. I placed prints of castles in these. I will link those from Etsy, here.
Nothing here is perfectly aligned. That’s the beauty of a gallery wall. It doesn’t have to be perfectly shaped. It can be half hazard, if you like. But the best part is it can be whatever you want it to be.
The tiny little white frame in the middle with the larger white frame adds contrast that was needed. I love playing with light and dark. They play off of each other beautifully.
Step Six: Make sure all your wall art, signs or 3D pieces are similar in color.
In the world of decorating you don’t have to be matchy, matchy.
The secret to having things connect is through color.
In other words, you can mix patterns and sizes of frames. It doesn’t matter.
It’s the color that makes it all look cohesive.
Choose a main color.
For this wall, it worked out that black is the connecting color.
The colors in the art are blue, white, light pink, green. The colors are muted and soft, so they blend into eachother.
However, it’s the black frames, the black print of the words on the signs, the black in the printed art, the black 3D mailbox and iron bird dinner bell that pulls it all together.
What ever color you choose as your primary color can tie your whole gallery wall together by incorporating it through out your printed art, frames or whatever you choose to create for your gallery wall.
Some things I learned.
- Above all, you need patience. I imagined the gallery wall in my mind. I applied my ideas to my wall. It didn’t come together as I planned right away. However, to save you time, please follow this next tip.
Tip: Measure the area on your wall you plan on displaying your gallery wall art.
Gather the framed art, signs and 3D items together. Place them on your floor. Arrange them the way you want. In other words, by doing this you will alleviate any frustrations.
It’s an excellent way to put a gallery wall together by sorting out the placement on the floor first.
- Measure. This saved me a lot of time. The design came together as I lined them up symmetric. As a result, no holes in your wall.
This concludes my tutorial, How to make a gallery wall.
If you’d like to see a view of my gallery wall on my YouTube channel see it below. I share a quick tour of my living room before I deck it out for fall.
Please stay tuned as I share Part Two: How to make a gallery wall. I will share more tips for hanging on a stairway wall.
Thanks for coming by Victorian Lane Farms.
Bye for now.