Beautiful Christmas Wreath Made With Vintage Plates
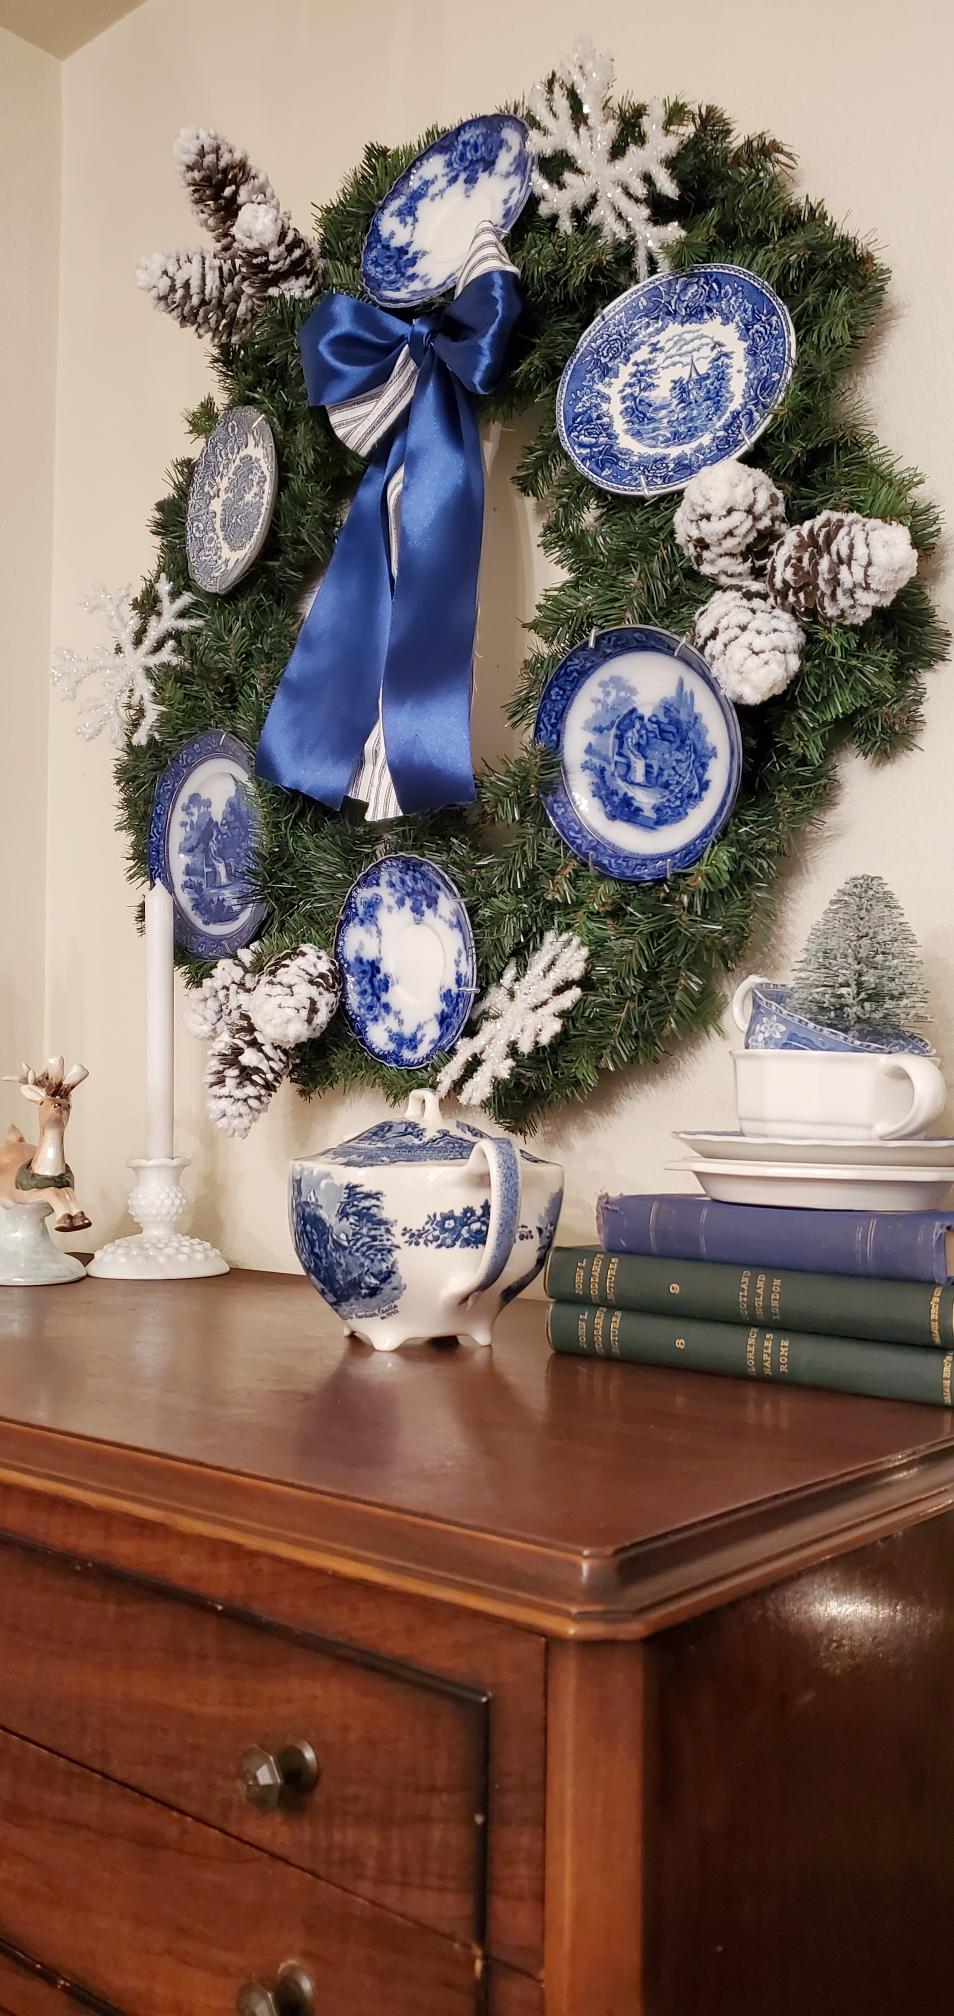
This vintage Christmas wreath is probably my favorite DIY I’ve ever done.
It is created with my most loved antique flow blue plates.
A few months ago, I saw this idea online when purchasing a huge, Merry Christmas sign from Antique Farm House.
They were asking over $300 for a similar wreath.

I immediately envisioned this wreath in my mind.
Thus this Christmas wreath was born.
Tucked away in my dresser were some antique flow blue plates that I haven’t used in a while.
What a perfect DIY to decorate my dining room for Christmas.
Once finished, all I could say was, wow!
It is stunning!
It is my joy to take you through 11 steps to create this vintage Christmas wreath.
For visual learners, here is a detailed YouTube video showing these steps. Plus, two other Christmas DIYs with a twist.
What you will need:

- Burlap Twine
- Scissors
- 3 Inches Wide Satin Ribbon – Navy Blue (62 inches long)
- Blue Ticking Fabric (enough to make a 62-inch long ribbon)

- 6 Ironstone dessert and/or saucers

- 6 Wire Plate Hangers for 5″ to 7″ plates

- 3 Pinecone Stems (linking one similar here)
- 3 White Glitter Snowflakes

- 30-inch Cedar Wreath
Instructions on how to make this Vintage Christmas Wreath.
Step One: Attach the hangers to the plates.


When looking for plate hangers, it is important to find ones with plastic ends to protect the plates from dings or scratches.
Step Two: Lace two 10-inch pieces of burlap twine through the back of the plate hanger.

Lace one 10-inch burlap twine through the bottom of the plate hanger.
Pull it through.

Lace the second 10-inch burlap twine through the top of the plate hanger.
Pull through.
Step Three: Tie the burlap twine to the wreath.


On the back of the wreath is a green wire base.
This is what we will connect the plates to.
Take the top two burlap twine ends connected to the plate hanger and bring them to the back of the wreath. As seen in the second photo above.

Tie the ends into a tight double knot.
Step Four: Repeat step three and tie the bottom ends of the burlap twine to the wreath base.


Now the plate is securely attached.
This was a simple solution to connecting the plates to the wreath base.
I love how it turned out!
Step Five: Tie all plates to the base of the wreath.

If a plate isn’t in the right place once connected, just scoot it over.

I did this a few times.

Some of the patterns of the plates may need to be facing upright.
Tip: If they aren’t, they can be adjusted by turning them inside the plate hanger.
That made this project go faster, knowing it didn’t matter if the plates faced the right way.
I fixed the crooked ones once I was done tying the plates to the wreath.
That was easy!

The plates are now connected.
Doesn’t it look beautiful already?
Now let’s go to the next step.
Step Six: Tie the three pinecone stems to the wreath base.


First, you will need to bend the bottom of the stem.
Place the bent stem under the wire of the wreath base.
Wrap it around the wire tightly.

Turning the wreath over, I took some twine and wrapped it around the upper part of the pinecone stem, and connected it to the green wire of the wreath base.
Then tied a tight double knot.
I repeat this for all of the pinecone stems.
Step Seven: Tie the snowflake stems to the wreath base.


First, bend the snowflake stem in half.

Placing the bent part of the stem under the bottom wire of the wreath base, you will want to take that bent part and wrap it around the wire as tight as you can.
Take some twine and tie it into place.
Step Eight: Cut 62 inches of the navy blue satin ribbon and blue ticking fabric ribbon.

For the blue ticking fabric ribbon, cut on the ninth line.

Fold the fabric in half and measure out 32 inches.
Cut along the line with a pair of scissors.
When done, you should have a 62-inch strip of fabric ribbon.

Cut 62 inches of the navy blue satin ribbon.
Step Nine: Layer the blue satin ribbon on top of the blue ticking ribbon and loop it into the top of the wreath.


Step Ten: Tie a bow.

Take both ribbons at the same time and tie a simple bow.
Step Eleven: Cut the bottom of the ribbon evenly.


You are now done! Yay!
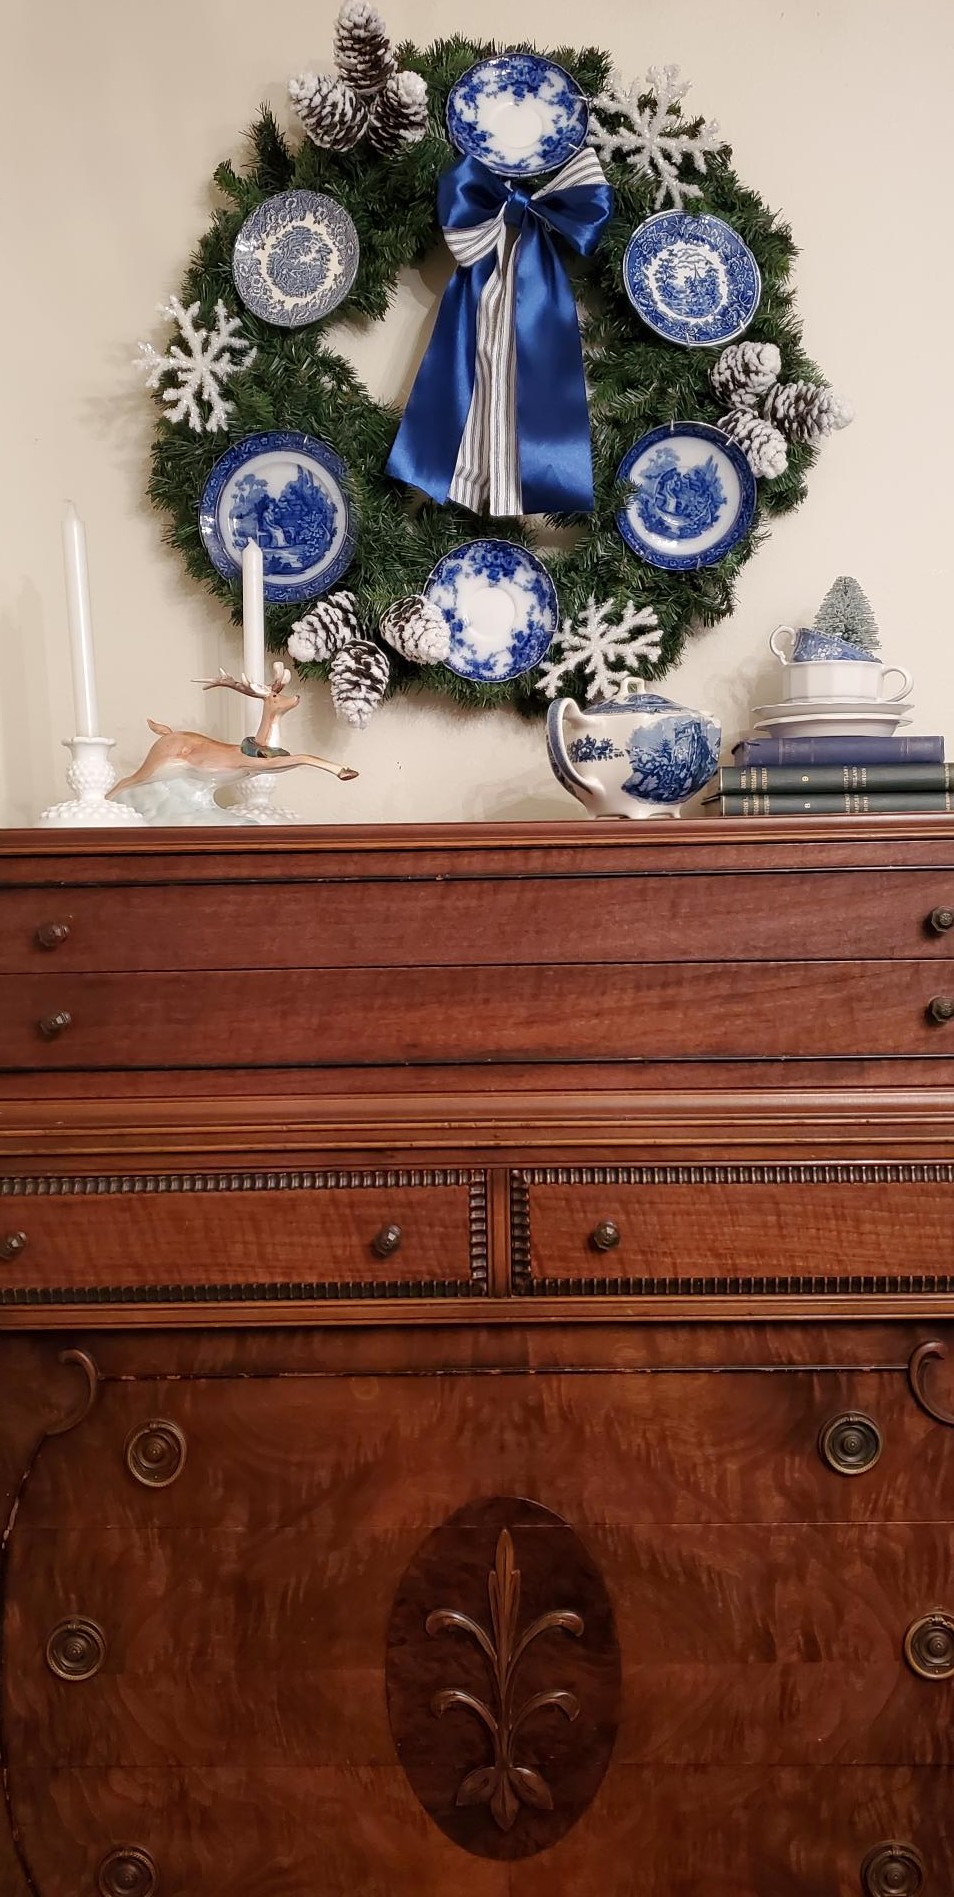
This wreath is breathtaking!
I think I may reuse these plates to make another wreath for Spring.
I hope you enjoyed this tutorial on how to make a Vintage Christmas Wreath.
Merry Christmas, friend.
For more DIYs, go here.
For Christmas gift ideas for everyone on your list, go here.
Thanks so much for coming by Victorian Lane Farms.