A Simple Magnolia Market Fall Wreath DIY For Front Door

For this DIY I’m using the Magnolia Market wreath and giving it a Fall look for my front door.
I remember the days when I would watch Fixer Upper.
Do you remember those days?
I was so into all the things that Joanna Gaines created to transform homes.
When I received this Magnolia Market wreath, I was over the moon.
And at the time, the $80 I spent to get it was worth it!
After all, I now had something that would make my home look a little closer to the ones she made over each week.
It was so inspiring!
Today, I’m giving this Magnolia Market wreath a makeover. I will be adding some simple fall things to it and hang it proudly on my front door.
Here is what I’m using for this Fall wreath.
Sharing Michaels store links for some of these things you can still get online. No affiliate links.
- Magnolia Market wreath
- Rusty Round Tin container for the center.

- 2 burlap pumpkins. Link here.

- White Stem flowers. Link here.

- Small white pumpkin with a stem on back to put into tin container.

- Mini pumpkin bush. Link here.

- Ashland shimmer lights. Link here.

Step 1: Take a few of the leaves of the Magnolia Market wreath and turn them over to reveal the beautiful orange on the back.

I took several of the leaves from the Magnolia Market wreath and turned them over.
Making sure not to be symmetric with this.
I’m wanting this to look natural, so I pick some random leaves on the sides, corners and even the middle.
Step 2: Attach the rusty round container to the back of the wreath.

I found this rusty round container at a décor store several years ago. I loved the rustic look of it.
It’s suppose to be rusty, which is why I love it.
Putting it to use in this way gave this piece new life.
I’m taking some twine and looping it through two holes in the back of the rusty container.
Once I pull it through, I make sure I have enough twine to wrap it around the back of the wreath.
I place the twine over the grapevine wreath in the back, and do a bow tie.

After I’ve adjusted the rusty tin to where I want it, I tie the twine into a bow and then I tie the bows together to make a knot to secure it.
Step 3: Cut each stem of the flowers and mini pumpkin bush with wire cutters.

I take wire cutters (Link for similar wire cutter, here) and cut each stem of the flowers and mini pumpkin bush.
No need to cut the stems of the little white pumpkin or burlap pumpkins.
Step 4: Place the white flowers and mini pumpkin bush into the rusty container.

Start out putting the mini pumpkin bush stems on the sides as pictured above.
Keep doing this and add some white flowers on either side as well. Like the picture below.

Step 4: Put two burlap pumpkins on each side of the rusty tin.

Take the burlap pumpkins and place them in a slant.
This will allow the little white pumpkin to be placed in the middle.
Step 5: Take the stem of the little white pumpkin and place it securely into the center of the rusty tin container.

Make sure the stem of the white pumpkin is straightened and push it into the tin until it is securely inside.
Step 6: Stick the batteries of the string lights into the side of the rusty tin container.

Tuck the batteries into the side of the rusty container.
This will make it easy to get to when you turn it on or off.
Plus, it allows for more string to go around the wreath.
Step 7: Place the shimmering lights loosely around the front of the fall wreath.

These lights are delicate and small.
I tried to make sure they are seen by loosely stringing them around and tucking a few of the wires of the string lights underneath a leaf to secure them.
I do this all the way around.
You are now done! It looks amazing!

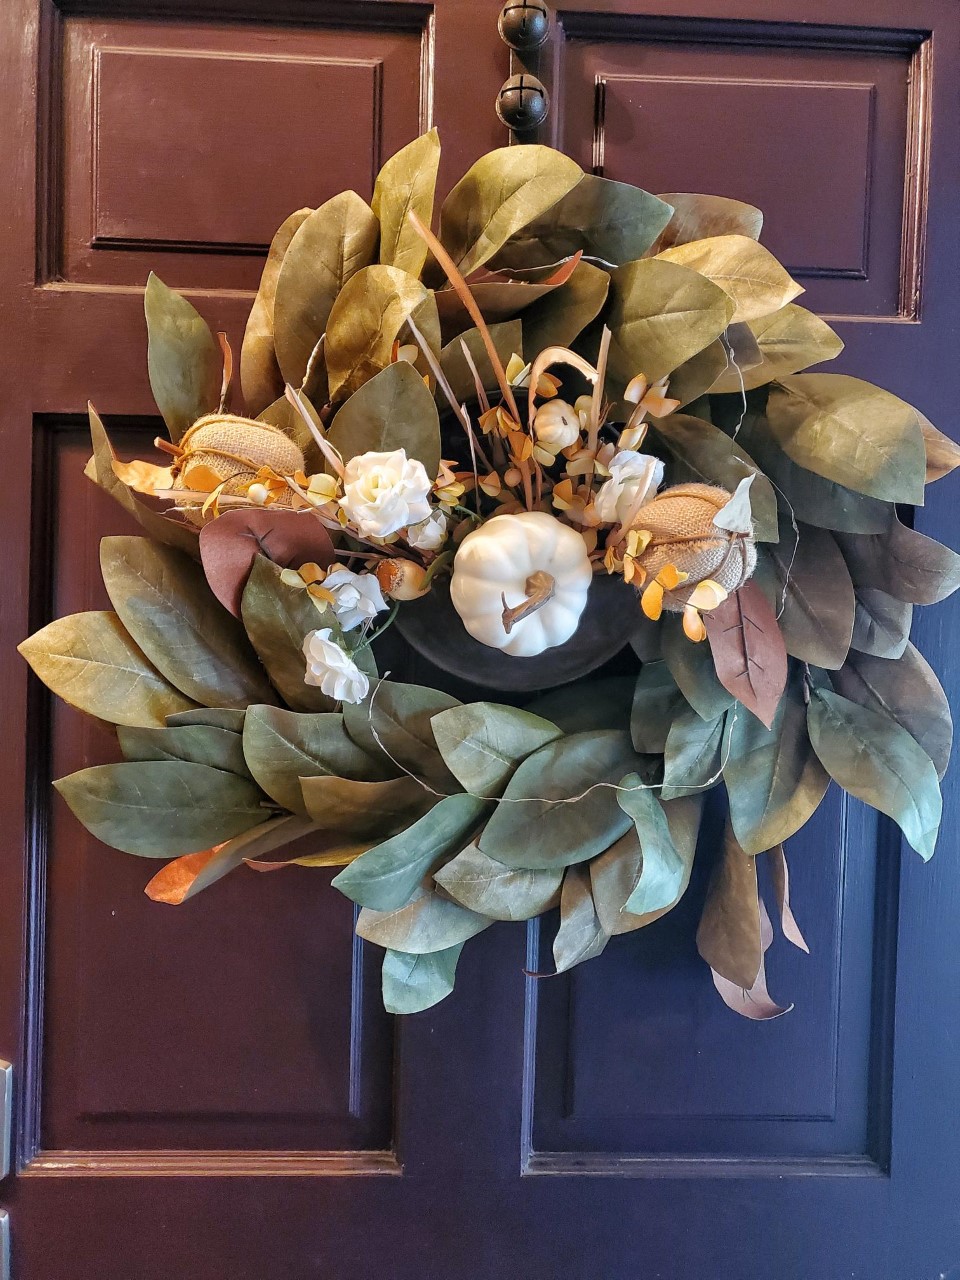
Here is the fall wreath on my front door.
It looks so beautiful placed here. I love the lights!

Here is a closer look of the fall wreath.

I hope you enjoyed this DIY project.
It was a lot of fun putting this together.
Making over this Magnolia Market wreath, it was important I didn’t ruin it with glue from a hot glue gun.
I think the simplicity of tying the rusty tin container onto the grapevine wreath was a great solution.
If you end up making this wreath, please share how yours turned out. I’d love to see it.
For more DIY ideas, follow this link.
The other Fall DIY that compliments this one is my Fall Basket I put together using similar materials. The link is here.
Thanks for coming by Victorian Lane Farms.
Until next time. Bye for now!